Step 3. Attach the sensor to the pipe
Once the H2know App confirms the sensor is transmitting, unplug the power adaptor from the power source, keeping the USB connector attached to the USB receptacle on the sensor. Walk to the installation location. The ideal location for the sensor is inside the building close to where the main water line enters. Note that the sensor is not rated for outside use, only install inside your building. The sensor requires access to a power outlet (or an extension cord) and access to a stable Wi-Fi signal.
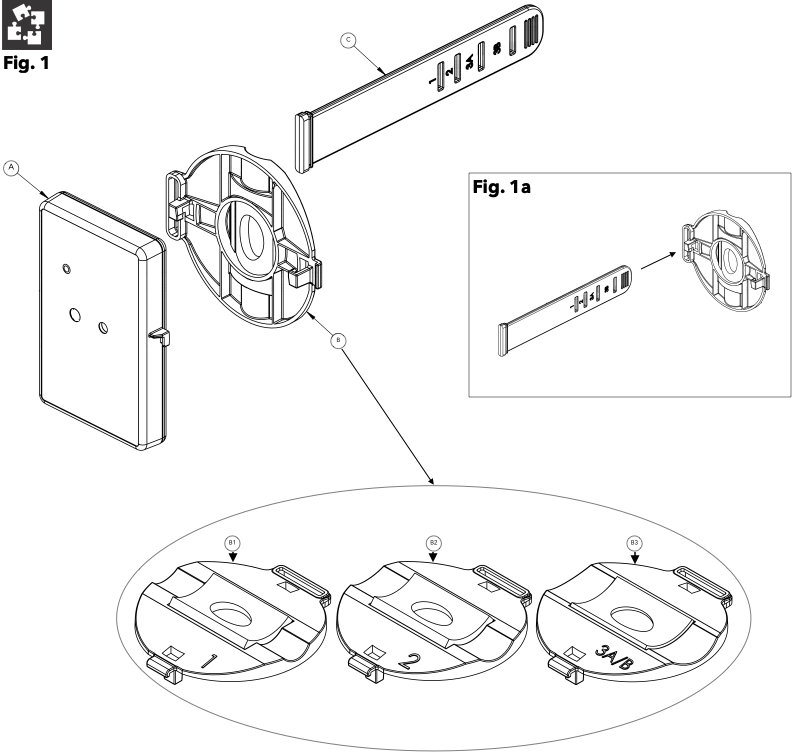
Once you’ve chosen the ideal installation location, determine the pipe’s diameter. If you are unsure of the diameter, print out the H2know Pipe Measuring Tool and measure the pipe’s size. Choose a coupler based on the size of your pipe:
- Choose coupler marked “1” for ¾ inch (nominal) / 22 mm (actual) pipes
- Choose coupler marked “2” for 1 to 1 ¼ inch (nominal) / 28 – 35 mm (actual) pipes
- Choose coupler marked “3” for 1 ½ to 2 inch (nominal) / 41 – 54 mm (actual) pipes
Then, assemble H2know in two simple steps (see Fig. 1):
- Insert the strap through the “sensor side” of the coupler. This is the unfinished side with the hooks (see Fig. 1a).
- Place the coupler on the sensor and turn the coupler clockwise to lock onto the hooks.
Now, attach the sensor to the pipe. Place the sensor downstream of the water meter on the pipe before it splits to multiple branches, but after any pressure reducer, water softener, iron filter, Reverse Osmosis (RO) system etc. that is processing water and potentially blocking the sound of water flowing. Ensure that the sensor is at a place that is convenient to a power outlet and that the sensor is not touching anything but the pipe it is measuring. Use the following guidelines for the direction the sensor should face:
- if near a furnace, HVAC, or other building infrastructure, face the LED away from the source
- if multiple sensors are in the same environment, face the LEDs of all sensors in the same direction
To attach, wrap the strap around the pipe and firmly attach it to the hook on the other side of the coupler using the hole that corresponds to the coupler size you have chosen:
- Choose strap hole marked “1” for coupler marked “1”
- Choose strap hole marked “2” for coupler marked “2”
- Choose strap hole marked “3A” for coupler marked “3” and the pipe is 1 ½ inch (nominal)
- Choose strap hole marked “3B” for coupler marked “3” and the pipe is 2 inch (nominal)
You will need to stretch the strap to put the hook in the proper strap hole. Watch our demonstration video to get more comfortable with the process. If you are having problems with this step, check out our Attaching To Pipe troubleshooting tips support article or our Attaching to Pipe FAQs. Or, if you have any questions about where to attach, take a photo of your pipes and email to: support@conservationlabs.com. We’re happy to help evaluate your situation!
Once attached, plug the cable into a power source. If you unplugged the USB connector from the receptacle on the sensor, carefully reinsert it with the proper orientation.

Wait 20 seconds while the sensor connects to Wi-Fi. A green blinking LED means that the sensor is connected. Congratulations! H2know is now collecting data and learning your water use. If your sensor’s LED is blinking orange, please read My sensor’s LED is blinking orange, what do I do?
Please take a picture of your sensor on the pipe and the area 10 feet around the sensor and email it with the sensor serial number to support@conservationlabs.com. This will allow us to service you better in the future.